Custom Search
HeLLo FrnZ Plz Write Ur Reviews and Comments About Site Content And Give Me Needed Suggessions Plz Plz Plz Plz

Or If U have Any Prob Mail Me at
funky29@gmail.com

Showing posts with label SYMBIAN TRICKS. Show all posts

Increase sound level on Startup tone

Author: Tejash Patel // Category:
Increase volume of startup sound...

Open X-plore,go to C\Private\10202be9 and edit "101F8763.txt" by pressing 8 on keypad and find this line:
"0x2 int 7 0 cap_rd=alwayspass
cap_wr=alwaysfail"

If it does not exist do this:
you must copy file from Z:\Private\10202be9\101F8763.txt to C:\Private\10202be9 , then edit it , find line 0x2 int 4 0 cap_rd=alwayspass (in n95-2 it's 40, not 70) and change 40 to 99 - it works

the phone must be hacked to see the private folders.

Change only the number "7 0" to "9 9" which is the maximum.Do not write "1 0 0",cause it will erase the "101F8763.txt" after the second reboot and it will be the default sound.Press "back",save it and reboot your phone.


The number "7 0" is different or the same in other phones,depending of the model.

This is how it looks now:
"0x2 int 9 9 cap_rd=alwayspass
cap_wr=alwaysfail"

I only tested in N93,but I think it will work with other S60v3/5 phones,so tested by your own risk.

Screen Rotation For E Series!!

Author: Tejash Patel // Category:
Hello. This is a repack of all the files needed to rotate the display of E Series phones but it is mostly done for the Nokia E51. You just need to install and make some adjustments.
For this to have been possible:-
I need to Thank Il.Socio for the great RomPatcher Plus!!!
I also want to thank Samir Ouedi For the RotateMe!!!
I want to thank all people that made this possible!!!!
Without these people this would not have been Done!!
Thanks Very Much!!

Instructions:- 1-Download and install this application here.
2-After the installation is complete go to C:\sys\bin and rename the file RomPatcherAuto.exe to 0RPAutostart. Apply c2z and wsini patches and autoapply. Restart and you are ready. Just open rotate me and rotate. If your phone is not E51 do not use the included c2z patch. Use the one that is compatible with your phone only. If any error occur please let me know.

Tejas Patel:D :D 8)

Nokia 5800 Screen Modding

Author: Tejash Patel // Category:


============================== AIO Home Screen ==============================

Includes 5 different Home Screens:

- Basic (OmniaHD)
- 6 Icons
- 8 Icons
- Navigation bar (Satio)
- 5530 HS

You can also install Orange HomeScreen, it should work fine with this HS, so you can have 6 different HomeScreens.

============================== Instructions: ==============================

- Before continue, delete “10207254″ (if exists) folder located in C:\Private\

- Rename all files in folder “10207254″ which has *.o00XX extension to your language, for example, if you use French language, change files to *.o0002 (See file included to find your language), is very important that always keep files *.o0000 and also *.o0001. If you already use UK english, then delete *.o00XX files.

- Copy the content (folder “10207254″) to C:\Private

- Copy the patch “2themes” to E:\patches.

- Apply the patches “2themes” and C2Z (necessary to use HS Basic and 8 Icons).

- Select any HomeScreen you want.

- Enjoy!

Note:

The patch C2Z is necessary (Basic, 8 Icons) and is highly recommended to use domainsrv.exe + C2Z4Bin in order to apply the HomeScreen when mobile starts.


Download here :AIO Home Screen v1.00 MultiLanguage

Author: Tejash Patel // Category:


The packaging includes:

- C2Z [the Maker to create saying patch]

- Call Log [The telephone stores the lost calls, sms and others for 30 days, with this patch will last 365days]

- Disable Charger Notice [To remove notices as " Loaded Battery " etc]

- Hide Menu [It(He,She) Conceals the Menu] - Long Multi Tap [do I contradict Short Muti Tap?]

- Open4all [it Allows to visualize secret folders of the mobile since(as,like) Deprive You, Resource etc. Necessary if You have the phone hackeado]

- InstallServer v20 [Install aplis without signing]

- InstallServer v21 [To install aplis without signing]

- InstallServer v11 [To install aplis without signing]

- Record Remove Tone [sound Removes recording]

- Remove network(net) Led [To remove led red of the chamber(camera)]

- Reset on Power Long Press [To leave touched button of ignition to restart phone]

- Shot Multi Tap [It(He,She) Reduces the time on having used the keyboard of the mobile of 0,6s to 0,3s.]

WING ENJOYING THEM

ALL_PATCHS_FOR_5800 By Tejas.rar

How to increase battery time for E71 and E66

Author: Tejash Patel // Category:
1. Set your Network Mode to GSM Mode when not using 3g.

2. Change Your Screen Display Settings.
Also, set your light time-out to something lower like 30 seconds. You'd be surprised at how much an extra 20 seconds at a time can drain your battery. Say you touch your phone 200 times throughout the day. Thats an extra 40 minutes your backlight is on if you keep at 60 seconds, as apposed to 40 seconds.

3. Don't Leave Applications Running When Unused.

4. Turn Off WLAN Scanning if your not using it.

5. Don't use your bluetooth headset if you absolutely don't have to.

6. It seems that there is a bug with WIFI Home screen plugin. I've tested it with my phone. If I use the plugin to connect to a wifi network, sometimes the plugin remains active and with Nokia Energy Profiler I could see, each minute a big spike of battery loss. To solve this simply deactivate the Wifi home screen plugin

7. Install cClock as default screensaver and make it show nothing

I hope it was halpfull.

Small Font Solution For Nokia E65

Author: Tejash Patel // Category:
Fonts too small? - Get new fonts!

Those who are still having problem changing fonts on your E65 phone, here is the solution....

Tested and works nicely on E65 (using Verdana font) with this firmware:
1.0633.18.01
11.01.07
RM-208

Note: To get your phone firmware, press *#0000# on Idle screen

What you need:
-PC
-PC card reader
-Y-Browser or F-Explorer programs in your phone

Steps:
1. Using Y-Browser or F-Explorer, go to directory “z:” (of your phone memory). If you do not have these program, go search the forum
2. Under the “z:” folder, go to folder named “resource”
3. go to folder named ”fonts”
4. you will see list of fonts file used by your phone. Note down name of each file. Most likely you will see;

S60SC.ccc
S60TCHK.ccc
S60ZDIGI.ttf
SWABIU.ttf
SWABRU.ttf
SWARIU.ttf
SWARRU.ttf

5. Take out your phone memory card and put it into your PC card reader
6. In your PC, go to folder C:/Windows/Fonts or download fonts from websites
7. Copy the “verdana.ttf” font file (or any other font file you prefer)
8. Duplicate font file you copied above (in this case you have to duplicate 7 times) and rename them exactly as mentioned under step 4
9. Access your memory card and find folder named “resource”. If there is no such folder, create one.
10. Under the “resource” folder, create a folder named “fonts”
11. Copy all files you created under step 8, and paste under the “fonts” folder you just created under step 10
12. Put back your memory card into the phone and turn on the phone

Your phone should now have new fonts

If you want to revert back to original font, just delete all files you created under step 11 and remove the “fonts” folder (in your memory card “resource” folder)

Good luck.

Get ur security code/lock code using NSS

Author: Tejash Patel // Category:
Tools
Required :

* Nemesis Service suite (NSS)
* Nokia PC Suite
* Data cable


Install NSS AND NOKIA PC SUITE

Steps :
1. Connect your phone in PC Suite mode(DON'T OPEN PC SUITE)
2. Open Nemesis Service suite (NSS)
3. Then click on scan for new devices button (top right hand side)
4. Click on phone info button.
5. Now Click on Scan.
6. Select Permanent Memory.
7. Click on Read.
8. It will read the permanent memory file

and save it on the disk at following path.
C:\Program Files\NSS\Backup\pm\.pm
9. Open the .pm file using Notepad.
10. Now scroll until field [308], and on the 5th Record (5=) your security code is saved at there.
11. Like 5=31323234350000000000
12. Remove all "3" digit and it will be 31323234350000000000
13. 12245 is your security code.


Download NSS at www.b-phreaks.co.uk
Download nokia pc suite at www.nokia.com

Some Useful Secret Codes on Nokia’s S60 Phones

Author: Tejash Patel // Category:
here are some useful secret codes for Nokia S60’s phones to get system information, such as IMEI and software version. To enter theses codes, the phone must be in the idle screen (not in the menu screen). What is idle screen? This is the screen where you see the operator name, date, time, battery level, signal strength and some other stuff. You can switch between idle screen and menu screen using Menu key ().

* *#0000# - Display the software version, the date when the software was built and the phone model. In some cases, the phone model is not the one used by marketing. It is the internal model used inside Nokia. For example, RM-36 is the internal name of Nokia 6680.

* *#06# - Display IMEI (International Mobile Equipment Identify) of your phone.

* *#2820# (*#BTA0#) - Display the Bluetooth device address of your phone.

* *#62209526# (*#MAC0WLAN) - Display the MAC address of the WLAN adapter. This is available only in the newer devices that support WLAN

* *#7370# (*#RES0#)- Reset your phone to the default factory settings. Usually you will need this code when you want to reset your phone back to the same condition when you got it for the first time. When the phone ask for security code, the default one is 12345.
Warning: Before you do reset the phone, make sure that you don’t have important data. Your data on the phone memory will be lost once you reset it.

* *#92702689# (*#war0anty#) - Display the life timer information of your S60 phone, i.e. the total time of phone call (in minutes). Some users have asked how to reset this timer; as far as I know the only way to reset it is by flashing the phone.


* *#7780# (*#rst0*) - This will soft reset your phone. It is different from *#7370# because all data, like contacts, calendar and notes, are not removed. It will only reset the phone settings, such as profiles, themes and shortcuts. The default lock code is 12345.


There is another key combination which is used to hard reset the phone (similar to #*7370). It is useful in some cases, for example when the phone cannot reboot. The trick is by switching off the phone then press and hold Call key (Green key) + * key + 3 key + power button for a couple of seconds

Change Fonts on N95 8GB, N81 8GB, N91 & N91 8GB & Other S60v3 Devices, tutorial

Author: Tejash Patel // Category:
I had problems when installing .ttf fonts on my N95 8GB but now i have finally found the solution.

1) Install FontRouter to your Mass or Memory Card.

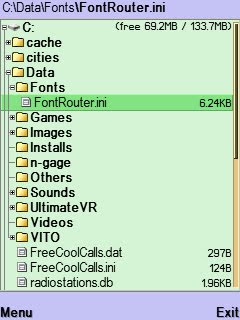
2) Use X-Plore to create a folder in C:/Data/ and name it Fonts. So you should have C:/Data/Fonts/

3) Move the fontrouter.ini from E:/Data/Fonts and paste it in C:\Data\Fonts


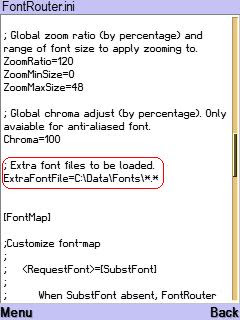
4) Edit the Fontrouter.ini file with x-plore like this;

Search for:
;Extra font files to be loaded
ExtraFontFile=\Data\Fonts\*.*

And change it to:
;Extra font files to be loaded
ExtraFontFile=C:\Data\Fonts\*.*
6) Exit and save the file (DO NOT SAVE AS)

7) Copy your *.ttf fonts to C:\Data\Fonts

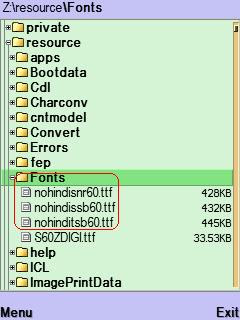
8) In case you don't know which fonts to use for your phone, just go to Z:/Resource/Fonts/ You'll see the fonts your phone uses. Just copy the font you want to use (Maybe from your PC) and copy them in 3 or 4 different parts & name it just like the one in Z:/Resources/Fonts/

9) Restart the phone and now it should be free to use in Card Reader & Mass Storage or Data Transfer.

NOTE:
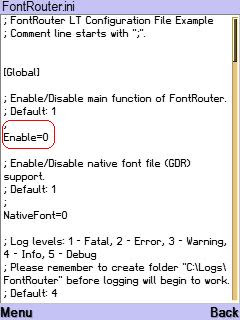
If you afterwards want to change your font or restore fonts to default just edit the fontrouter.ini file again and change
Enable=1 to 0
Restart and change the fonts, then Enable again to 1 and restart new fonts are displayed now.

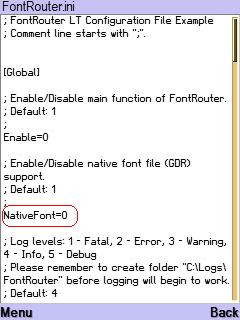
In case you open MSDict, SlovoEd, Merriam-Webster or any other dictionary or reader application in your phone & your phone restarts by itself after closing the dictionary, then you need change disable to NativeFont. Change the 1 to 0 & save the FontRouter.ini file.


I have tried this on N91, N91 8GB, N81 8GB, N95 8GB and other phones that has internal memory and they all work.


Font.Router.LT.v9.Build.20071109.S60v3.Unsigned.zip

How to recover lost security code on bb5 phones

Author: Tejash Patel // Category:
I HAVE FOUND IT SOMEWHERE ELSE NOT DISCOVERED IT BUT DO NOT REMEMBER WHERE I HAD SEEN IT.... ALL CREDITS TO ORIGINAL UPLOADER

METHOD 1 " TO RECOVER THE CODE

THIS WILL WORK FOR ALL THE NOKIA BB5 HANDSETS like NOKIA 6120c, NOKIA 5700, NOKIA 6300, NOKIA 6630, and many otherzzz..

Download Nemesis Service Suite (NSS103812.exe) from the site mentioned below:
12.27 MB 2007-08-26 NSS103812.exe
http://www.b-phreaks.co.uk/NSSDownloadLanding.htm


CONNECT UR FONE VIA USB CABLE IN PC MODE & INSTALL THE DRIVERS FOR UR CELL FONE PROVIDED WITH NOKIA PC SUITE.THEN EXIT PC SUITE

THEN INSTALL

Nemesis Service Suite

downloaded from the above site


SELECT USB VIRTUAL DRIVE during installation (in case of nokia 6120cfor nokia 5700 use diamond protection)


AFTER INSTALLATION OPEN IT


THEN CLicK ON SCAN BUTTON

AFTER THAT CLicK ON PHONE INFO

NOW CLicK ON SCAN

NOW CLicK ON PERMANENT MEMORY TAB given on right bottom of application

NOW CLicK ON READ

IT WILL READ THE PERMANENT MEMORY FILE

& WRITE IT TO THE DISK

UR PM FILE WILL BE LOCATED IN THE PATH:

D:\Program Files\NSS\Backup\pm\356252*********.pm


open that PM file in NOTEPAD


now scroll uptil FIELD [308] and on the 5th RECORD ur security code is saved

like that

5=31303038350000000000 remove all the "3" digits and it will be like that

5= 10085 0000000000 now its 10085 thats it.UR LOCK CODE IS 10085

METHOD 2 TO RESET THE CODE


You need a Data cable that comes with your phone and Nemesis Service Suite(later named as NSS) installed on your PC..

Connect normally turned on phone to the cable and install drivers for it,is asked.
Start NSS and click on magnifier glass - marked with mouse cursor.


When driver and other NSS software informations are displayed,click on big Phone Info (1.) button and then on little Scan (2.) button.If everything is OK you will get message Done! (field marked with arrow).


Now click on big Tools (3.) button,


then on tab Factory Settings (4.)


now here,if you have a Symbian phone then you must check Symbian box (it is above the Reset button marked with 6.),if you have S40 3rd phone then leave Symbian unchecked.
Select User code (5.) if not allready selected and click on Reset (6.) button.
If everything goes well message Done will appear again in that field marked in second picture+those messages in regular information window.


That's it,your Security code is set to factory 12345 again.

I tested it on my N79 and it works.

Nseries, Xseries & Eseries Camera Mods

Author: Tejash Patel // Category:
Thanks to the people providing me with the 10282EDC.txt file from their phones, I have been able to Mod the files for each phone to work with it's Specific Megapixel Quality and Settings, so that it won't crash or stop the camera from working by using an incorrect one, and so it will not mess up the quality.


Downloads:


Read Before You Do Anything:
    WARNING: Using the wrong file may cause your Camera to not Open, Mess up the Quality and/or force you to Hard Reset your phone.[/size]
    1] No, The file doesn't have to exist in the Z:Drive for this to work, on ANY phone - And you also can NOT write to the Z:Drive.
    2] Yes, this will increase the File Size of your Photos, some of mine range from 600KB to around 2MB, but the quality is worth it.
    3] Yes, You can remove this Mod by simply deleting the File where you pasted it.
    4] No, the size of the Picture doesn't matter. You may find that taking a picture of distant scenery ends up being of Lower File Size, this does not mean the quality is any worse; you will see a difference depending on the Colors in the Photo, Close Up Detail or the amount of things happening in the photo.
    5] You will see the Quality this Mod provides when you Zoom into your photos AFTER taking them.
    6] Try looking at your Photos on your PC/Mac, you can see the difference better this way.
    7] No, you do not need the C2Z Patch for this to work.

Hacking:
I recommend using this method to hack, it costs a small fee; http://helloox2.com/. If you seek a free way to Hack your phone, look on Symbian Freak else where - this topic is not to help hacking phones.


Instructions:
Phone Must Be Hacked
    1] Download the Corosponding file for your phone to your PC/Mac/Phone.
    2] Turn off Caps via any method (Open4All Patch/RomPatcher's Disable Caps/Caps Off etc).
    3] Open X-Plore or Y-Browser (Or any File Manager you prefer)
    4] Copy/Move 10282EDC.txt
    5] Go to C:/Private and paste 10282EDC.txt into Folder 10202be9.
    6] Exit X-Plore/Y-Browser (Or Whatever you are Using)
    7] Reboot Phone (or Switch off then on)
    8] Check C:/Private/10202be9 to see if 10282EDC.txt is still there.

Troubleshooting:
    File Keeps Deleting Itself When I Reboot, How Can I Fix This?
    Method 1] If the file keeps deleting itself, using X-Plore, mark it as Read-Only and System File (Just highlight the file, press Menu, go fo File then Attributes and you can change the settings)
    Method 2] If you are still finding that the file is Deleting itself after you reboot, switch caps on before you reboot, otherwise it gets deleted.

    I See No Difference?
    1] If you are using the N82 or the N96, you will see little difference because of the default settings for the camera are already quite High.
    On the N96, you are only gaining a 5% Improvement in Quality.
    People have reported difference in quality with the N82, and I have also, firsthand, seen the difference in quality.
    2] You will see the Quality this Mod provides when you Zoom into your photos After taking them

C2Z in mobile patch generator 1.01

Author: Tejash Patel // Category:


This app is designed to let you make your own c2z patch on your phone and no need to use PC.
It's easy to use, select Options - Generate,and wait for a monent.
The c2z patch is generated in E:\c2z.rmp. Cut it and paste it to E:\patches,open Rompatcher-- apply.

Tested and working on N85 V30

P.S you need to install P.I.P.S. libraries first

Credits to Tejas Patel


Download


For ARM
version use 1.1a

For THUMB version use 1.1t

C2ZMaker-v1.1a.sisx.zip

C2ZMaker-v1.1t.sisx.zip

Touch style menu folders for N97 hacked (updated)

Author: Tejash Patel // Category:
Remember when we used to mod the munu folders etc by edditing the appshelldata.xml file, well in n97 its changed abit, we edit the new xml file the same way, the new file is called matrixmenudata.xml and the directory of the file is C:/private/200113dd/content we can edit it to read icons from menu.mif thats used on older devices.

REQUIRES a HACKED N97

heres my n97s new folders in the menu..


Edited my files and added a connectivity, python and games folder.

If you use my mod your menu will look like the above images, however you can simply rename/move/remove folders to your own taste

Heres my n97s modded menu files .. http://www.speedyshare.com/565823601.html unpack and copy menu.mif to c:/resource/apps and matrixmenudata.xml to c:/private/200113dd/content and reboot

Menu layout files mod n97

Author: Tejash Patel // Category:
hey all,
i fould these files in z\recourse
they look to me like the files for the layout of the menu, please tell me otherwise before i go spending days playing with this haha, put them on c, modded them but no luck,
thats with c2zbin runnin and c2z on auto by the way,
im just wondering if anyone has looked at them before and know something i dont, and if anyone would know what other files should be moved to c for it to work

ive attatched the files

Grid And List

Hacking S60 3rd - permissions for untrusted midlet

Author: Tejash Patel // Category:
So, here's the hacking alternative - proceed at your own risk. By replacing some strings, we can give equals permissions to untrusted applications with the manufacturer signed applications.

First, update your S60 phone normally using Software Update tool from Nokia. It downloads updates to your harddrive, storing binary images to

C:\Documents and Settings\All Users\Application Data\Nokia\Nokia Service Layer\A\nsl_service_module_00001\www.dsut.online.n okia.com.oti.caresuite\Products\

Directory contents look interesting and for my phone there is about 50 MB rom image there. Simple strings scan on rom image shows contents some fragments of text based java permission file, which by closer look very interesting (at around 0x2310000 in my case) :

Now, all you need to do is to open up your favourite hex editor and write "MaximumMode: Blanket" to permissions you want to allow, and if you feel risky you can change the DefaultMode as well.

Now re-run the software update, force re-runing and phone will be flashed with your new permissions. After installing midlet, you should see more permission options in the application manager (select midlet, click open)...

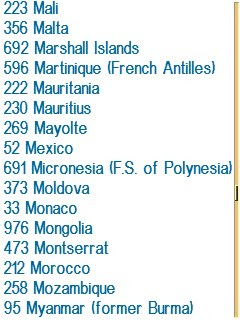
A way to have the International Country Code list

Author: Tejash Patel // Category:
1) Go to
CODE
http://www.studyabroad.com/telcodes.html


2)Right cl!ck anywhere on the page and "Save Page As" (I use firefox)

3)copy the telcodes.html file and its folder to your phone E:\Documents for example.

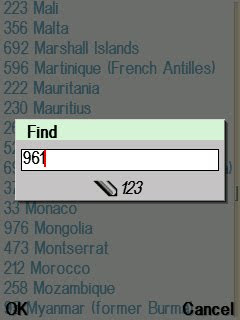
4) using Xplore open the telcodes.html, to search the list press "1"
to go page up press : *
to go page down press : #

Hope its helpful ... Goodluck.


Do Trick to solve problem corrupt memory card

Author: Tejash Patel // Category:
Using microSD on Nokia N95

PROBLEM: set memory password on phone, then i try to open with card reader on pc and it cause my pc to 'not responding' state, then i remove the memory card (safely remove hardware) and put it back to phone... and i just got MEMORY CARD CORRUPTED!

REMEMBER: DUN EVER FORMAT IT WHEN PHONE ASK U TO DO SO, just choose NO!

TRICK/SOLUTION:
1. Download and install r-studio (powerful and cost-effective undelete and data recovery software) here from RapidShare
Code: Select all
http://www.r-tt.com/downloads/rsd_en_4.exe


About R-Studio 4.0:
R-Studio is a family of powerful and cost-effective undelete and data recovery software. Empowered by the new unique data recovery technologies, it is the most comprehensive data recovery solution for recovery files from FAT12/16/32, NTFS, NTFS5 (created or updated by Windows 2000/XP/2003/Vista), HFS/HFS+ (Macintosh), Little and Big Endian variants of UFS1/UFS2 (FreeBSD/OpenBSD/NetBSD/Solaris) and Ext2FS/Ext3FS (Linux) partitions. It functions on local and network disks, even if such partitions are formatted, damaged or deleted. Flexible parameter settings give you absolute control over data recovery.
--------------------------------------------------------------

2. put it back to card reader and plug in to pc, run r-studio to examine (it's ok succeed or failed)
3. safely remove hardware then put it back to phone, switch on the phone and ur memory card should back to working normally.

share your PC's intrnet connection with your phone

Author: Tejash Patel // Category:
Sign GNUBOX.sis

1. First get gnubox.sis. http://rapidshare.com/files/4548686/gnubox_s60v3.sis

2. Then download this file, it has the application Signsis.exe http://download.macromedia.com/pub/developer/make_sis_explained.zip

3. Get this app from Symbiansigned.com . You will need to sign up for an account here
https://www.symbiansigned.com/DevCertRequest_30_10_2006_v2.0.exe


4.Start the DevCertRequest program
It'll be easier if u name all the files as gnubox
=Step1: Select as output file for your *.csr file
=Step2: If you dont have ACS pub ID , select No. Then select your key output *.key file name , and fill password.
ps: for Step1 and 2, have the files output to ur desktop.
=Step3: Fill Personal info
=Step4: Add capabilities (i selected all)
=Step5: Finish Developer cert request. Then *.csr file will created.
- Login in to Symbiansigned.com, ** "My Symbian Signed" tab
- ** "Developer Certificates" on left side bar,
- ** "Request" and upload *.csr file and wait
- Will automatically change to Dev cert page. You can download dev cert, *.cer to the desktop

Signing The File
- Go to "Start" -> "Run" -> type command
- In the command prompt, type cd (then go to your sissign dir) (enter)
- Then type signsis -o -s -v gnubox.sis gnuboxs.sis gnubox.cer gnubox.key password (enter)

example: signsis -o -s -v c:\gnubox.sis c:\gnuboxs.sis c:\gnubox.cer c:\gnubox.key xxxx (enter)

CONFIGURATION :

i'm using LAN and not dial-up ADSL.

Download and install AnalogX at: http://www.analogx.com/files/proxyi.exe
This enables you to share your internet connection.

Pls install your gnubox [DOWNLOAD] on ur phone first...
Install mRouter DOWNLOAD] on your PC also..


ON YOUR PC (Microsoft BT stack)
Switch on BT on ur PC and ur fone.

Step1: Right click the BT icon in the system tray, "Open Bluetooth Settings"
go to "COM Ports".
If it is blank, click on "Add"-> "Incoming (device initiates the connection)"
Look at the COM number...mine is COM4. it varies...let's put it as COM#

Step2: Go to "Control Panel" -> "Phone and Modem options". Select the tab "Modem"
Add a modem. Check the box saying "Don't detect modem".
Select the type as "Communications cable between two computers"
connected on Bluetooth Serial Port COM#

Step3: Go to "Control Panel" -> "network connections". Create a new connection
"setup advanced connection" --> "accept incoming connections" --> select ur COM# and uncheck other connections/modems and leave the rest of the stuff as it is and then continue and finish.

Step4: Right click on the mRouter icon on the system tray go to "Connected Device"
Refresh the page until it discovers ur phone. Select your fone in the device selection
screen and click "Next>".
Uncheck the box where it says ?Automatically connect to this device when it is in range?
and click "Finish"

Step5: Now right click on the m-Router taskbar icon and click on "Advanced Settings"
Click on the View button under "Additional COM Ports"
Select the COM Port used by your Bluetooth device (COM#)
After setting the COM Port, click "OK"
Under connectivity methods, look for Additional COM Ports and expand it to make
sure your COM port is there. Click "Close"
Make sure that there is no error message...
Now that our m-Router is all set, let?s configure Gnubox!!

GNUBOX!!

Step1: On the phone, Go to "Tools"->"Settings"->"Connection"->"Access points"
Go to "Options"->"New access point"->"Use default settings"
Name it 'Bt' .
Make sure you set it to use 'Data call' as the bearer.
Set the number to call to something that cannot be called (e.g 321),
username as abc, password: xyz
Leave the rest as it is...
Then, "Options"->"Advanced Setting" Leave all untouched EXCEPT "Proxy Port Number".
enter it as 6588

Step2: Start GnuBox.

Now you should see on the screen that the DialOutISP record is found,
and the phone number you just entered is printed on the screen.
However, the ModemBearer should still show 'No rec'.
- Select "Options"->"Install"->"Create records"
- Exit gnubox with "Options"->"Exit"
- Start GnuBox again.
- Now you should see on the screen that the ModemBearer is shown and the 'No rec' error is gone.
- Create the bluetooth pairing between your phone and the computer.
- Launch GnuBox. Select "Install"->"Set RAS login script"
- Then select "2box bluetooth"->"Serial port"
- On the upcoming device selection dialog, select your computer,
and in the question about encryption click Yes (or OK if you only have that).
- Launch your phone browser and enjoy!!

Deleting "Stuck" Installer Files in S60 3rd EditioN

Author: Tejash Patel // Category:
I have seen a problem with ?stuck? installer files in S60 3rd Edition phones for a couple of times. The information from Application Manager shows that the applications are not installed. However, they cannot be deleted because there is no Delete menu (see screenshot below). They cannot be re-installed either because it always fails with ?Unable to install? message. Those files are basically just stuck there.

From my opinion, it looks like a bug in S60 3rd Edition (not sure if this has been fixed in S60 3rd FP1). I don?t really know how to reproduce this problem, but it has happened to my phones several times. Once, I saw this problem after one application failed to install. In other occasions, I saw this problem after resetting my phone to the default factory settings.

What should we do if we have this kind of ?stuck? installer files in S60 3rd Edition? One way is to delete the installer file manually via Windows Explorer. Unfortunately, we cannot use any file manager application because those files are located in a protected folder.

* Firstly, connect your phone to a PC via USB.
* Choose Data Transfer (a.k.a. Mass Storage). Do not select PC Suite because you won?t be able to browse protected folders in PC Suite mode.
* Open Windows Explorer on your PC.
* Go to \private\10202dce on the phone?s folder.
* There, you should be able to find the installer files (.sis). Just remove them using Windows Explorer.

You can also acess & even delete these file using phone just go to file manager

And use Search (find) the folder private
and in that go to the 10202DCE and delete the file which are not installing

Solution for backing up & restoring Messages--- Symbian

Author: Tejash Patel // Category:
A breakthrough for Symbian S60 3rd Edition
Solution for backing up and restoring Messages
I am very glad to inform you all, the MOST-WANTED solution for backing and restoring your messages from your memory card. By default in symbian S60 edition phones, when we store messages on memory card, it gets stored in system/mail folder.
The same thing happens on Symbian 3rd edition phones too, but only difference is that the mail folder is buried deep inside the private folder..
What you need to access it..
1) Connect your handset to pc in the ?Data transfer? (Mass storage) mode
2) Go to the Private folder on your memory card
3) Open the folders in sequential manner
4) Look for 1000484b (PARENT) folder or like that under which you will find Mail (Child) or mail2 folder, you are looking for.
5) Copy that (PARENT) folder to your PC

If you have hacked phone everything is even eaiser: just go to c:\private\ and back up entire 1000484b folder!